This is my 2nd post of the day.
I just love good chili and cornbread when it's cold like it is today. I thought I would share my recipes with you.
First of all, the chili is so easy. I found a recipe on the back of a Bush's bean can one day when I was in Wal-mart, but I adapted it to make it easier for me. You could add onion and pepper if you like. I just prefer not to hassle with it.
Chili
Brown 1 lb. ground beef and drain. Pour it into a large pot and add the following ingredients: 1 chili seasoning mix package (I use mild), 1 can corn (drained), 1 can diced tomatoes, 1 can tomato paste, 1 can dark red kidney beans (I only use one can, but you could use two), and 1 cup of water. Bring to boil. Cover, reduce heat, and simmer for 25-30 minutes. Enjoy!!!
Cornbread
The cornbread is a recipe I got from All Recipes. It's called Homesteader Cornbread. Not only is it easy, but it is delicious! Make sure that you buy corn meal. It's easy to get confused and buy corn meal mix. Just wanted to warn you... It says that it takes 15 minutes to prepare, but I can do it in less than 10 minutes. So simple... It makes me want to make some.
Showing posts with label recipes. Show all posts
Showing posts with label recipes. Show all posts
Tuesday, November 18, 2008
Sunday, September 28, 2008
A good dinner calls for a good dessert
Last night despite not feeling well I cooked dinner for my family and Jeremy's mom and brother. I tried two new recipes: Baked Ziti and Big Bad Chocolate Muffins. Both of them are keepers, so I want to share them with you. The Baked Ziti is super easy and takes delicious! It's a meatless meal, so it's a frugal meal! I recommend keeping the extra 1/2 jar of spaghetti sauce to add to your leftovers. Can you guess what's for dinner tonight? The muffins are definitely a dessert muffin and remind me of the chocolate muffins that I love at Sweet Tomatoes. We added some ice cream on top like I do at Sweet Tomatoes. Yummy!
Baked Ziti
Ingredients
1 lb ziti pasta
15 ounces ricotta cheese (1 container)
8oz. mozzarella cheese, grated and divided
1 ½ jars of spaghetti sauce (26 oz. jars)
1/2 cup parmesan cheese, grated
Directions
Preheat oven to 350.
Boil ziti, following package directions, drain and place in a large bowl.
Mix all the ricotta cheese and half of the mozzarella with the ziti.
Spray a 13×9 pan with Pam.
Cover the bottom half of the pan with about half the sauce.
Put the ziti mixture on top of sauce.
Pour remaining sauce on top of ziti.
Sprinkle with the Parmesan cheese.
Top with the remaining mozzarella cheese.
Cover with foil and bake for 20-30 minutes until cheese is melted and it is lightly golden. (Remove foil around the last 10 minutes or so.)
Big Bad Chocolate Muffins ( From the book Cupcakes From The Cake Mix Doctor)
1 devils food cake mix
1 (3.9 ounce) package instant chocolate pudding
3/4 cup vanilla yogurt
3/4 cup water
1/2 cup oil
3 eggs
2 cups chocolate chips
Preheat oven to 400 degrees. Lightly grease muffin pan (this makes about 20 muffins)or use muffin liners. Set aside. In a mixing bowl combine cake mix and pudding mix. In a separate bowl combine yogurt, water, oil, and eggs. Stir the wet ingredients into the dry ingredients just until combined. Stir in chocolate chips. Fill muffin tins about 3/4 full. Bake 20 -22 minutes or until center springs back. Cool on wire rack . (Store in a tight container, and they are yummy for several days! You could even pop them in the microwave for a couple of seconds... I doubled the recipe and froze 1/2 of them for later. I will thaw one and pop it in the microwave for my dessert one night.)
Wednesday, September 10, 2008
In the mood for dessert?
I have been cooking a lot more these days. I have also been craving sweets like crazy. (No, I'm not pregnant.) Instead of paying too much for not so great packaged sweets, I have been making more homemade sweets to satisfy my cravings and serve my family. In honor of my grandma, I made my first apricot nectar cake on Monday. I posted the recipe last summer. You can find it in my archives. Let me just say that I love that cake, and it is super easy to make. I made it in a bundt pan because I wanted a way to seal it up on my kitchen counter in my cake container. We have dreaded "palmetto bugs" that the pest control guy can't seem to keep out. Gross. I know. I try not to think about it because it upsets me to have them and a 12 week old baby in the same house. I also use the microwave sometimes to store things... Have you ever done that? It's a great place to keep your food safe from little creatures. Anyway, the cake was great, but today I was thinking about how I could surprise Jeremy with a dessert. He has enjoyed the cake, which is surprising, but he loves peanut butter. I found a no bake peanut butter bar recipe a few weeks ago, so I tried it. It was simple and tastes great! You store this in the fridge, which works well for keeping the "palmetto bugs" out of it. Here's the recipe from allrecipes.com:
Peanut Butter Bars (No Bake)
1 cup butter, melted
2 cups graham cracker crumbs
2 cups powdered sugar
1 cup peanut butter
1 1/2 cups chocolate chips (I don't recommend using dark chocolate because it is very rich.)
4 tablespoons peanut butter
Mix together the butter, graham cracker crumbs, powdered sugar, and 1 cup peanut butter until well blended. Press into the bottom of a 9x13 pan. Melt chocolate chips with peanut butter. Stir until smooth. Spread over crust. Refrigerate several hours before cutting into squares. Serve and enjoy!
Saturday, August 30, 2008
new recipes to keep
This week I made 2 new recipes that we liked. (We did NOT like the Baked Oatmeal.)
First of all, I got this Crockpot Lasagna recipe a year ago from Missy at Sweet Funky Vintage. She posted this on her blog, and I meant to try it before now. I made it yesterday and have leftovers to eat and some to freeze for later. Here is the recipe:
Crockpot Lasagna
Ingredients:
1 lb. ground beef
1 onion, chopped
1 clove garlic, minced
1 jar spaghetti sauce (26 oz)
1 can tomato paste (6 oz)
1 c water
1 tsp oregano
1 tsp salt
1 package no boil lasagna noodles
1 1/2 c ricotta (or cottage cheese if you prefer)
4 c shredded mozzarella
1/2 c shredded parmesan
In skillet, brown ground beef with onion and garlic. Drain. Add spaghetti sauce, tomato paste, water, oregano and salt.
Next, I decided to make some homemade pancakes. I don't know who posted this recipe. It was in the comment section of the frugal breakfast recipes. Jeremy, Samuel, and I ate these pancakes. Samuel doesn't seem to like pancakes, but Jeremy and I enjoyed them. For those of you who can't imagine why I would make them from scratch, I can assure you that it took about 5 minutes to make the batter. I'm not kidding. Just 5 minutes... I use buttermilk from the baking aisle. It's in a small paper container, and you just add water to it. Once you open it you have to remember to refrigerate it, but if you're like me, it would be a huge waste of money to buy regular buttermilk. You could also use the vinegar idea in the recipe.
Pancakes from Scratch
First of all, I got this Crockpot Lasagna recipe a year ago from Missy at Sweet Funky Vintage. She posted this on her blog, and I meant to try it before now. I made it yesterday and have leftovers to eat and some to freeze for later. Here is the recipe:
Crockpot Lasagna
Ingredients:
1 lb. ground beef
1 onion, chopped
1 clove garlic, minced
1 jar spaghetti sauce (26 oz)
1 can tomato paste (6 oz)
1 c water
1 tsp oregano
1 tsp salt
1 package no boil lasagna noodles
1 1/2 c ricotta (or cottage cheese if you prefer)
4 c shredded mozzarella
1/2 c shredded parmesan
In skillet, brown ground beef with onion and garlic. Drain. Add spaghetti sauce, tomato paste, water, oregano and salt.
(Note from Marianna: The size of your crockpot will determine how many layers you get. My oval 6 quart fit 3 layers, so I basically split the mixtures into 3 parts. It was a little awkward arranging the noodles. I broke them up for the edges. That didn't affect the taste one bit. The ricotta cheese was hard to spread, so I washed my hands well and used my fingers.)
In crockpot, place 1/4 of the meat sauce mixture (for me it was 1/3). Place one layer of noodles. Place one layer of ricotta, sprinkle layer of mozzarella and parmesan. Continue layering.
Cook on low 4-5 hours!
Next, I decided to make some homemade pancakes. I don't know who posted this recipe. It was in the comment section of the frugal breakfast recipes. Jeremy, Samuel, and I ate these pancakes. Samuel doesn't seem to like pancakes, but Jeremy and I enjoyed them. For those of you who can't imagine why I would make them from scratch, I can assure you that it took about 5 minutes to make the batter. I'm not kidding. Just 5 minutes... I use buttermilk from the baking aisle. It's in a small paper container, and you just add water to it. Once you open it you have to remember to refrigerate it, but if you're like me, it would be a huge waste of money to buy regular buttermilk. You could also use the vinegar idea in the recipe.
Pancakes from Scratch
1 tablespoon sugar
1 teaspoon baking powder
1/2 teaspoon baking soda
1/4 teaspoon salt
1 beaten egg
1 cup buttermilk or sour milk (add 1 tablespoon vinegar to 1 cup of milk and let sit 5 minutes)
2 tablespoons cooking oil
Mix everything together. Pour 1/4 cup onto hot, lightly greased griddle. Turn over when top is bubbly and edges are slightly dry. Makes 8 pancakes.
Wednesday, April 9, 2008
Muffin recipe
This morning I made some muffins using a recipe I found on a blog. I am guilty of not writing down the name of that blog. If this is your recipe, thanks! Jeremy doesn't care for cinnamon sugar, which I think is the best part, so he passed. Samuel and I enjoyed them though! These muffins remind me of donuts. YUMMY!!!
Feather Light Muffins
Feather Light Muffins
1/3 cup shortening
1/2 cup sugar
1 egg
1 1/2 cups cake flour
1 1/2 tsp. baking powder
1/2 tsp. salt
1/4 tsp. nutmeg
1/2 cup milk
Topping:
1/2 cup sugar
1 tsp. cinnamon
1/2 cup butter, melted
In a mixing bowl, cream shortening, sugar and egg. Combine the dry ingredients; add to creamed mixture alternately with milk. Fill greased muffin tins two-thirds full. Bake at 325 degrees for 20 to 25 minutes. Let cool for 3 to 4 minutes. Meanwhile, combine sugar and cinnamon in small bowl. Roll warm muffins in melted butter, then in sugar mixture. Serve warm.
Yields 8 to 10 muffins.
Wednesday, January 30, 2008
bread machine fun and tips
I just love the taste of homemade bread! I don't use my bread machine that often, but yesterday I got the urge to make some whole wheat bread to go along with some chicken salad I prepared. I went online to find a recipe, and I was so excited! To my surprise, it didn't rise much at all, and I ended up throwing the majority of it away. I was disappointed. Being the stubborn one that I am, I was determined to make some good bread today. This time I used a box (mix), and as I was reading the box, I came across some information that would have been helpful yesterday. It said to use room temperature water because warm or hot water would prevent it from rising. Well, that explains my goof yesterday. In the winter, I tend to use only warm water at the sink, so I must have used warm water for the bread. At least now I'm aware of what happened and will be careful not to let it happen again. In case you're wondering, today's bread is divine- Hawaiian (sweet bread).
One more bread machine tip- I recommend the light crust setting if you think you will toast or heat of some of the bread later.
Oh, and the great thing about the bread machine is that I'm not nervous to leave the house with it on. I took Samuel for a walk while it was baking. I would never have done that with the regular oven.
I've posted several more times this week, so keep reading!
Sweet potato casserole for toddlers (or any hungry adult)
So, Samuel is no longer a baby, but he still loves sweet potatoes. I have bought the microwavable ones (wrapped in plastic and sold individually). They work great, and I added butter and brown sugar to them! Samuel has also had an Outback sweet potato with butter and brown sugar and was delighted. Last week I decided to make a sweet potato dish that my mom has been making forever. Samuel had eaten it at her house, so I knew he already liked it before I went to the trouble to make this. It's a recipe from the Williamsburg Cookbook. My mom was over last week, and we made them together. Enjoy! The recipe below is my toddler friendly version of the Williamsburg recipe.
King's Arms Tavern Sweet Potatoes
(8-10 adult servings)
5 medium sweet potatoes
1/2 cup light brown sugar
3 tbsp butter
1/2 tsp cinnamon
1/2 tsp nutmeg
1/4 tsp salt
1 cup milk
1. Preheat oven to 400.
2. Grease a 1 1/2 quart casserole dish.
3. Cook sweet potatoes in boiling salted water until done. (We put the potatoes in cold water. Once the water was boiling, we turned the heat down to 3 and kept the lid on. Once the water was boiling, it took about 30 minutes. Just check your potatoes with a fork and make sure that you can poke it all the way in easily before you take them out.)
4. Peel and mash potatoes well.
5. Stir in all of the remaining ingredients and use electric mixer to get ride of lumps. (I did this on a high speed, but watch for flying sweet potatoes.)
5. Put mixture into prepared casserole dish.
6. Bake at 400 degrees for 30 minutes. (I didn't cook it right away, so I refrigerated it and when I was ready to cook it, I cooked it longer- like 35-40 minutes.)
Since I don't love sweet potatoes, I decided to freeze this in ice cube trays (just like baby food). Once they froze, I put the cubes in ziplocs like Amy suggested. When I want to give them to Samuel, I take 3 cubes out of the freezer, defrost them in the microwave until warm, and voila! It's a great way to give your little one a vegetable! Since Samuel is a picky vegetable eater (like his mommy), I will be making this recipe often!
Saturday, January 19, 2008
I sure wish I had...
some Thin Mint Girl Scout cookies because this pie looks sooooo good!
Last week I recommended that you check out Cookie Madness. Well, tonight I came across this recipe on her blog:
I will be making this as soon as the cookies come out!
Last week I recommended that you check out Cookie Madness. Well, tonight I came across this recipe on her blog:
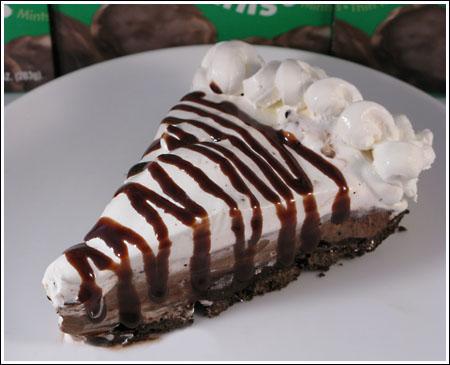
Triple Layer Thin Mint Pie
1 box Thin Mint cookies (32 cookies)
3 tablespoons melted butter
2 cups cold milk
2 packages (4-serving size each) Jell-O Chocolate Flavor Instant Pudding
1/4 teaspoon peppermint extract
1 tub (12 oz.) Cool Whip Whipped Topping, thawed, divided use
Remove 10 cookies and set aside.
Crush or process remaining cookies, then mix them with the butter. Press firmly onto bottom and up side of 9-inch pie plate.
Pour milk into large bowl. Add both boxes of pudding mix and beat with wire whisk 2 minutes or until well blended. (Mixture will be thick.)
Spoon out 1 1/4 cup of pudding into another bowl and stir in peppermint extract. Pour peppermint pudding mixture over crust. To remaining pudding mix, add in 1 cup of whipped topping. Spread the pudding/whipped topping layer of the mint layer.
Chop remaining cookies and combine them with about 2 ½ cups (doesn’t have to be precise) whipped topping. Spread this mixture over the top. The pie might look kind of messy at this point, so clean up the edges.
Chill for 4 hours or until set
To garnish, place remaining whipped topping in a plastic zipper bag. Snip off a corner of the bag (about ½ inch up from corner) and squeeze whipped topping around sides decoratively.
To make thin zig-zags, pour COLD chocolate syrup into a small zipper bag. Snip a very, very tiny cut off the bottom corner and drizzle away!
Makes 8 servings.
-----------------------------------------------------------------
I will be making this as soon as the cookies come out!
Tuesday, January 15, 2008
Another Favorite- Paula Deen

I wanted to share another recipe from a favorite of mine, Paula Deen. I made this today. I haven't tasted it yet because it has to refrigerate for 24 hours before you can eat it, but I know this is going to taste great! (I have tasted a version of this that my mom made, and it was yummy!) Oh, I made it lower fat by using low-fat graham crackers and Cool Whip. Now I just have to wait until tomorrow to eat it...
Eclair Cake
Monday, January 14, 2008
Yummy dinner recipes
I made dinner last night for Jeremy, Samuel, and my parents. Now that I have my energy back I wanted to make a special dinner. After searching some cooking blogs and friends' blogs, I decided to make lasagna and yeast rolls. My mom brought the salad, so I didn't have to think about that. The lasagna recipe I used was great! It isn't something you do when you only have an hour to cook, but I enjoyed making it. The Pioneer Woman Cooks has become one of my favorite blogs, and I found The Best Lasagna. Ever. Recipe. All of us enjoyed it. My dad said it tasted like gourmet lasagna, and that you couldn't get better lasagna at a restaurant. The best part of this recipe is the simple ingredients that end up tasting like gourmet even though they are far from it. Once again she didn't have a printer friendly recipe, so I made my own by cutting and pasting. If you send me an e-mail, I will send you this printer friendly recipe.
The Perfectly Easy Dinner Rolls were a treat! I've never made rolls before. I wish I had started them after lunch because they take awhile to refrigerate and then rise. Thanks to Monica for a great recipe! I can't find her post, so I will copy what I cut and pasted from her blog:
The Perfectly Easy Dinner Rolls were a treat! I've never made rolls before. I wish I had started them after lunch because they take awhile to refrigerate and then rise. Thanks to Monica for a great recipe! I can't find her post, so I will copy what I cut and pasted from her blog:
Perfectly Easy Dinner Rolls:
1 c. warm water
2 packages active dry yeast
1/2 c. butter, melted
1/2 c. sugar
3 eggs
1 tsp. salt
4-4 1/2 c. unbleached all-purpose flour
Combine the warm water and yeast in a large bowl. Let the mixture stand until yeast is foamy, about five minutes.
Stir in butter, sugar, eggs and salt. Beat in flour, 1 c. at a time, until dough is too stiff to mix (I did not need all 4 1/2 cups). Cover and refrigerate for at least 2 hours or up to four days.
Turn the dough out onto a lightly floured surface and divide dough into 24 equal portions. Shape into a ball and place into greased 9x13 baking pan.
Cover and let rolls rise until doubled, about one hour. Bake at 375 for 15-20 minutes or until rolls are golden brown. Break rolls apart and serve. Rolls will be fluffier in height if baked closer together
Saturday, January 12, 2008
Blogs to read if you like to cook or bake
Here are some of my favorite cooking/baking blogs:
Cookie Madness
The Pioneer Woman Cooks
Coconut and Lime
Leah's Recipe Exchange
Southern Girls Home Cookin
Freezer Chicks (Thanks for this one, Monica!)
The Canadian Baker
Cookie Madness
The Pioneer Woman Cooks
Coconut and Lime
Leah's Recipe Exchange
Southern Girls Home Cookin
Freezer Chicks (Thanks for this one, Monica!)
The Canadian Baker
Cookie recipe that I love
My mom used to make a great cookie when I was growing up. She called them cowboy cookies. They had oatmeal, chocolate chips, and rice cereal (Rice Krispies). I was on the Pioneer Woman Cooks and found a recipe for Oatmeal Crispies that made me think of those cowboy cookies. I just added Rice Krispies to the dough to give them a crunch. I wasn't interested in adding chocolate because I don't need... Plus, I don't give Samuel chocolate. This cookie is a hit! All 3 of us like them (4 if you include the baby).
I froze a roll of them and will make them some other time. I do recommend cooking them longer if the dough is refrigerated. They definitely weren't done in 10 minutes. More like 12 or 13. Just keep your eyes on them.
Oh, if you e-mail me, I will send the recipe that I typed using her pictures and directions since she didn't have a printer friendly version.
Happy Baking!
Friday, January 11, 2008
If you like sweets but don't have the time to bake...
Do you like cookies and candy? The Pioneer Woman Cooks has a great idea for enjoying sweets without the work. Take a look here.
Thursday, January 10, 2008
Pioneer Woman’s Weird Version of Chex Party Mix
Ok, so now that I'm in my 2nd Trimester I have more energy to post. I've posted a lot this week; check them out below.
This recipe was a hit in my house. Samuel, Jeremy, and I all loved it. If you scroll to the bottom, you will see a printer friendly recipe. For my version of her recipe, I left out the Tabasco, only used 1 stick of butter, and replaced Corn Chex with Cheerios. I overcooked the 1st batch when I followed her time of 1 hour and 15 minutes. I should have followed my intuition because I remembered only cooking Chex Mix 1 hour in the past. So, go with one hour. Trust me. Oh, and she has garlic cloves listed twice, so skip one of them. Enjoy!
This recipe was a hit in my house. Samuel, Jeremy, and I all loved it. If you scroll to the bottom, you will see a printer friendly recipe. For my version of her recipe, I left out the Tabasco, only used 1 stick of butter, and replaced Corn Chex with Cheerios. I overcooked the 1st batch when I followed her time of 1 hour and 15 minutes. I should have followed my intuition because I remembered only cooking Chex Mix 1 hour in the past. So, go with one hour. Trust me. Oh, and she has garlic cloves listed twice, so skip one of them. Enjoy!
Tuesday, January 8, 2008
Top 100 Recipes of 2007

If you like to cook, you might want to take a look at this. Food Network has put together the Top 100 Recipes of 2007. Enjoy!!!
Sunday, January 6, 2008
Chocolate Cake by Martha Stewart

On Friday, Jeremy and I watched Martha Stewart's show. Jeremy isn't a dessert person, but after seeing her make a chocolate cake, he was sending me off to the store to buy the ingredients. Would you believe that Wal-mart didn't have a single box of cake flour? We ended up going to Bi-lo later that day, and I made the cake on Saturday. That is the first cake I've made from scratch. Now I know why... It's very time consuming, and then the homemade icing was even more time consuming. I'm not complaining because it made Jeremy happy. I just won't be making another one next week.
I definitely recommend this cake and icing recipe. Just keep in mind that it is very rich... The cake is actually called Devil's food cake. I don't know the difference and couldn't taste the difference. Maybe someone could enlighten me. To me, it was chocolate cake.
I think the cake turned out well. Jeremy and my parents agree. (My Kitchen Aid mixer was a huge help. The paddle attachment worked wonderfully.) Tonight I took a piece to 4 neighbors, and I will be curious to see what they thought. I warned them that it's my first cake from scratch. I'm sure the next one will be better.
One suggestion- Despite what the recipe says, set your timer for 25 minutes and check the cakes with a knife or toothpick. ( I set my timer for 30 minutes but wish I had set it for 25.)
Moist Devil's Food Cake with Mrs. Milman's Chocolate Icing
Friday, November 30, 2007
Sugar cookie recipe and icing recipe
I found a good sugar cookie recipe in a Parenting magazine this week. I thought I would share it with you. Here it is. I have to admit that I tried to roll and cut my cookies before the dough was hard enough, so I gave up and formed little circles. I need to practice that. I've never used cookie cutters before... I bought a ton of cookie cutters because I planned on making this a tradition with our children, so I need to figure it out!
In addition, Monica shared an icing recipe on her blog awhile back, so I dug that up and used it. I can't believe how easy it was to make homemade icing. Why didn't I think of this sooner???
Here is her icing recipe (I couldn't link to the icing post alone):
3 c. powdered sugar
1/4 c. shortening
1 tsp. vanilla
Small drops of milk gradually added
Food coloring as desired
Mix all ingredients to the desired consistency with a hand mixer. This amount will frost one batch of sugar cookies or cupcakes or will fill and frost a two-layer 9 inch round cake (thin layer).
*************************************************************************************
I just found an overnight coffee cake recipe and am going to try it out tonight to take to a breakfast tomorrow. We're going to Bluffton to a friend's church for breakfast and then to a parade. It should be fun! I will share the recipe if it is any good!
Don't forget to read the post below this one!
Sunday, October 14, 2007
Soft Pumpkin Cookies
I have searched my history to try to figure out where I got this recipe, but I officially give up. If I got this recipe from your blog, you will have to forgive me. Thanks for the wonderful recipe. I made these cookies tonight at my parents' house, and they were a hit. Samuel enjoyed them as much as we did. They are delicious!!! I only cooked them for 13 minutes. I recommend looking at them by that point because mine were done. You don't want to overcook them!
Soft Pumpkin Cookies:
1/2 cup softened butter
1 1/2 cup sugar
1 egg
1 tsp. vanilla
1 cup solid pack pumpkin
2 1/2 cups flour, sifted
1 tsp. baking soda
1 tsp. baking powder
1 tsp. cinnamon
1/2 tsp. nutmeg
1/2 tsp. salt
Preheat over to 375 degrees. Cream butter, egg, and sugar together. Add vanilla and beat until fluffy. Sift flour, soda, baking powder, cinnamon, nutmeg and salt together. Add flour mixture and pumpkin alternately to butter and sugar mixture. Drop by rounded Tablespoon fulls onto a lightly greased cookie sheet. Bake for 15-20 minutes, depending on your oven. Makes 3 dozen.
Wednesday, September 26, 2007
Banana bread (or muffins)
I love to make banana bread or muffins when my bananas get too ripe, so last night I made muffins. I wanted to share this Food Network recipe with you: Banana Bread. I've been using this recipe for awhile, and I like it! When I make muffins, I cook them for about 15-20 minutes. Just watch them when you get close to the 15 minute mark.
On more tip: I keep a few out in a ziploc bag after they cool and then store the rest in the refrigerator or freezer. That way they don't spoil. When we're ready to eat them, I heat them in the toaster oven. They taste so good out of the toaster oven! Yummy!
Do you have a good bread or muffin recipe to share? I would love it!
Happy Baking!
Monday, September 24, 2007
If you like Jim 'N Nick's cheese biscuits
I ate at Jim 'N Nick's several times while I was teaching Spanish, and I absolutely loved their cheese biscuits. You can order 1/2 dozen of them, and I could eat all of them if I let myself. Today I was reading Monica's blog and was so excited to find that she had posted a copycat recipe of those famous cheese biscuits. They are more like muffins than they are biscuits; you cook them in a muffin tin. I made them tonight to go along with Amy's Kitchen vegetable lasagna (from my overflowing freezer). The biscuits were great! I couldn't believe how much they tasted like the Jim 'N Nick's biscuits. Next time I will use less sugar. Tonight I didn't use all of the sugar it called for, but I still think they were a little too sweet. I'm going to cut it to 1/2 cup of sugar and see if that's enough. I shredded my cheese instead of using prepackaged shredded, which I loved, but I would love even more than 1 cup of that cheese next time. It's fun trying out a recipe and changing it to meet your taste! I almost forgot to tell you that the muffins were done after 13 minutes even though the recipe said 20 minutes. Thankfully I was watching them. If I were you, I would stay close to the oven. Overcooked muffins aren't any good...
This week I plan to make oatmeal bread, and I will share the recipe if I like it.
Happy Cooking!
This week I plan to make oatmeal bread, and I will share the recipe if I like it.
Happy Cooking!
Subscribe to:
Posts (Atom)


